Go Back   Maxum Boat Owners Club - Forum > Maxum General > Projects and Customisations
Click Here to Login
Register FAQ Community Calendar Today's Posts Log in

Reply
 
Thread Tools Search this Thread Display Modes
 
Old 04-20-2017, 01:39 AM   #1
Lieutenant
 
Join Date: Feb 2014
Location: Seattle, WA, USA
Posts: 73
Default 3200 SCR - Cabin Floor Replacement

Thought you all might be interested to see my progress on replacing the cabin finish floor in my 1994 3200 SCR.

For a 23-year-old boat, the finishes have all held up remarkably well. But the carpet on the main cabin floor was getting worn and the wood floor by the galley had been water-damaged from numerous freezer defrostings leaking onto it over the years. It was starting to look a bit ratty.

I thought it would look better and be more practical if it was all one material instead of being divided into part wood and part carpet. I like the wood look, but don't want real wood floors in a boat (wood and water don't mix). So settled on wood-appearance heavy-duty strip vinyl as a reasonable substitute. It looks a lot like a wood floor, goes down easy, and (most importantly) is 100% waterproof.

The first step was ripping up the old floor.

I thought this was going to be a one-day project. That turns out not to be the case, and the demo of the existing floor is the reason. The carpet came up relatively easy, though the pad was glued down and had to be scraped off in little chunks.

The wood galley floor, on the other hand, was a real pain to get out. If you're considering doing this yourself, be aware that it's going to take a LOT of elbow grease.

The wood strips which make the finish surface are glued down onto a piece of subflooring, which is in turn glued down directly on the plywood-fiberglass sole below. The first layer of glue is not very sticky. But the glue between the subfloor and sole bulhead is another story. Maxum was not kidding around when they installed this stuff. I had to chisel it out in small pieces, which took five hours and broke TWO heavy-duty chisel knives.

You can see the subfloor about halfway out here. Notice all the little pieces of subflooring broken off in flakes as I had to chisel under the heavy lines of thick black marine adhesive holding the thing down. This picture was taken 4 hours into a 1-hour project which ultimate took 6.

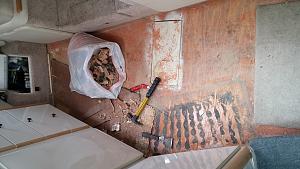
Click image for larger version

Name:	20170416_142327.jpg
Views:	67
Size:	208.1 KB
ID:	4958

After a lot of cursing, hammering, and sweat, I managed to get it all up and hauled off to the dumpster. The final bare sole is exposed here:
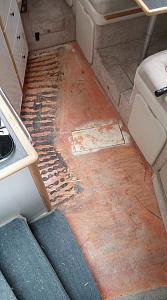
Click image for larger version

Name:	3200SCR_FloorOut.jpg
Views:	64
Size:	87.9 KB
ID:	4959

You can see in both those pictures that there is a bilge compartment access hatch under where the carpet used to be. It's stapled shut and I didn't really want to get down in there. I figured if nobody had looked down there for 23 years, it could probably wait another couple decades barring an emergency. But I am a little curious what its purpose is.

You can also see how much of that black glue was under the subfloor. A LOT. It was bonded permanently to both surfaces and had the consistency of vulcanized rubber. I didn't so much chisel it off as cut THROUGH it with the hammer and chisel very close to the surface of the sole bulkhead.

The good news is that this part is done. So up next I'll be epoxy-patching a couple of spots where the glue chiseling pulled some of the fiberglass off the plywood sole, then installing the vinyl plank floor down over all of it.

I am planning to glue down the new floor, just to keep it from moving around, but this experience has me thinking I'd better use something a little less intense than 3M marine adhesives, just in case I ever do need to get to that hatch again.

The plan is to put in the new floor this weekend. I'll post more pics and an update when I've got them.
__________________

ertyqway is offline   Reply With Quote
Old 04-20-2017, 01:59 AM   #2
Lt. JG
 
Join Date: Oct 2016
Posts: 35
Default

Wow. Be sure to post pic of finished project!
__________________

K&T3200 is offline   Reply With Quote
Old 04-20-2017, 02:15 AM   #3
Admiral
 
mmwjr's Avatar
 
Join Date: Feb 2012
Location: Essex, Maryland
Posts: 10,604
Default

What is the plan for the steps and raised dinette floor? Carpet or vinyl?
__________________
1997 Silverton 362, 7.4 Crusaders
1997 2400 SCR, 5.7 Vortec / Bravo 2

Mike
mmwjr is offline   Reply With Quote
Old 04-20-2017, 05:13 PM   #4
Lieutenant
 
Join Date: Feb 2014
Location: Seattle, WA, USA
Posts: 73
Default

I'm leaving the carpet on the dinette and steps for now. The way it's installed, it's pretty difficult to replace it without having to redo a lot more than just the floor.

I also left the carpet on the floor in the mid-cabin and mid-cabin step. If you look closely at the second photo, you can see where I cut the carpet at the step nosing (bottom of pic). There will be a brass transition strip from the carpet to the new vinyl floor at that line.

Fortunately, the cabin sole carpet does not otherwise turn up the wall bulkheads as a single piece, so I didn't have to do any more carpet cutting. I just cut it at the step nosing and yanked it all out.
ertyqway is offline   Reply With Quote
Old 04-20-2017, 05:16 PM   #5
Admiral
 
mmwjr's Avatar
 
Join Date: Feb 2012
Location: Essex, Maryland
Posts: 10,604
Default

Got ya, post pictures of the rest of the project when you have them.
__________________
1997 Silverton 362, 7.4 Crusaders
1997 2400 SCR, 5.7 Vortec / Bravo 2

Mike
mmwjr is offline   Reply With Quote
Old 04-20-2017, 09:04 PM   #6
Captain
 
HavaMax's Avatar
 
Join Date: Jul 2009
Location: Lake Havasu City AZ
Posts: 832
Default

Ertyqway, use the search function and look up my flooring project. I did pretty much the exact same thing your doing. I did not glue new vinyl planks down. I have not had any problem with them moving or separating. The access panel you refer to is over the water tank, although the water fittings are accessed from the shower sump area.
__________________
Dezart Elegance Pool Tile Cleaning
1994 Maxum 3200 SCR
HavaMax is offline   Reply With Quote
Old 04-27-2017, 01:34 AM   #7
Commander
 
Join Date: Jul 2011
Posts: 345
Default

Did the same on my 1995 3200 SCR and posted pictures here => http://www.maxumownersclub.com/forum...loor-5339.html

I did do the floor under the dinette and changed how the hinged compartment works.
The steps out of the cabin I left.
The aft-cabin was redone with carpet.

And you're right, it was a lot of work.
jamanati is offline   Reply With Quote
Old 04-29-2017, 09:50 PM   #8
Lieutenant
 
Join Date: Feb 2014
Location: Seattle, WA, USA
Posts: 73
Default

I got the new floor in this morning (finally). Here's a couple pics....

I started from the mid-cabin end...


And worked my way toward the bow...


And here it is all done. It looks pretty good with the original decor (I used TrafficMaster Blonde Maple from Home Depot)...
ertyqway is offline   Reply With Quote
Old 04-29-2017, 10:05 PM   #9
Lt. JG
 
Join Date: Oct 2016
Posts: 35
Default

Looks great!
K&T3200 is offline   Reply With Quote
Old 04-29-2017, 10:42 PM   #10
Admiral
 
mmwjr's Avatar
 
Join Date: Feb 2012
Location: Essex, Maryland
Posts: 10,604
Default

Nice work, what was the total cost to install?
__________________
1997 Silverton 362, 7.4 Crusaders
1997 2400 SCR, 5.7 Vortec / Bravo 2

Mike
mmwjr is offline   Reply With Quote
Old 04-30-2017, 06:08 AM   #11
Captain
 
HavaMax's Avatar
 
Join Date: Jul 2009
Location: Lake Havasu City AZ
Posts: 832
Default

Very good...
__________________
Dezart Elegance Pool Tile Cleaning
1994 Maxum 3200 SCR
HavaMax is offline   Reply With Quote
Old 05-01-2017, 06:44 PM   #12
Lieutenant
 
Join Date: Feb 2014
Location: Seattle, WA, USA
Posts: 73
Default

Total cost, all-in, was $140. I had to buy two packs of flooring material since they only come in 25 sq. ft. cartons. The area of that part of the cabin floor is just over 25 sq. ft. and the wastage is higher than normal because of the odd shape.

In addition to the two packs of vinyl flooring (TrafficMASTER Allure 6 in. x 36 in. Blonde Maple Luxury Vinyl Plank Flooring (24 sq. ft. / Case)-53019 - The Home Depot), I also bought the aluminum transition strip, vinyl floor tape, cutting knives, 20 ft of rubber base for the galley toe kick, and a new adjustable square as well as the two chisel knives I broke getting the old floor up.

I only used three strips of flooring from the second pack, so I have a LOT left over. Trying to think of other ways to use it.
ertyqway is offline   Reply With Quote
Old 05-01-2017, 06:48 PM   #13
Lieutenant
 
Join Date: Feb 2014
Location: Seattle, WA, USA
Posts: 73
Default

Also, after all that and as happy as the Admiral and I are with the results, the floor is quite a bit slicker than the old carpet. Walking on it in socks can be an adventure if the boat is rocking around. So the Admiral is now looking around for a 30" x 72"+ bath mat / carpet runner to put on it. Seems a bit odd after all that work, but the advantage of the mat is that it can easily be taken out for cleaning and drying. It can also be easily changed if it gets messed up, which the old carpet did quite often.
ertyqway is offline   Reply With Quote
Old 05-09-2017, 11:28 AM   #14
Commander
 
Join Date: Jul 2011
Posts: 345
Default

Nice!
__________________

jamanati is offline   Reply With Quote
Reply

Tags
3200scr, floor


Posting Rules
You may not post new threads
You may not post replies
You may not post attachments
You may not edit your posts

BB code is On
Smilies are On
[IMG] code is On
HTML code is Off
Trackbacks are Off
Pingbacks are Off
Refbacks are Off


Powered by vBadvanced CMPS v3.2.3

All times are GMT. The time now is 12:30 PM.


Powered by vBulletin® Version 3.8.8 Beta 4
Copyright ©2000 - 2024, vBulletin Solutions, Inc.